Показват се публикациите с етикет lighting. Показване на всички публикации

събота, 29 февруари 2020 г.

Здрасти хора,
Понеже снимката с доматчето се получи много интересно, реших да направя едно клипче, в което да покажа как осветяването променя кадъра.


For the English-speaking fans - following my tomato picture, I decided to show how lighting changes the image. This video is in Bulgarian only but you can understand what's what from the video, I guess...


сряда, 5 април 2017 г.

Street photography guide for dummies :)


Hello everyone!

I know it's been quite a while since I wrote but I've been up to quite a lot these days (and months) so I have an excuse.

Welcome to the newest part of Shoot Like a Pro - Advanced, Hope you'll like it.

I guess from time to time each one of us wants to take a few street shots - because we have some spare time but lack the money to travel somewhere far away or just because we want to try out our hand at street photography.


In its essence, street shooting is the easiest and the most difficult genre. It's difficult because you need to have a keen eye and to know when to shoot and when not to do it. It's easy because you document real life events and you just need to keep you eyes and ears open.


So far so good, but what are the basics?

I'm by no means an expert but here are a few tips and tricks - I'll use my most recent street shoot from my home town - Sofia, in winter as an illustration.

Rule 1 - know your geography


You simply CANNOT go out shooting without knowing what is where around town. This includes knowing not only where to go but where you should NEVER go. You see, photo equipment is too expensive to risk it for nothing. Besides, if you are a 5-feet-tall girl like me, you'll think twice before going out to the ghetto.

So step one is to see what is available and if you'll be able to access the place in a safe time of the day. The picture above is from a place called Lavov Most (literal translation for that would be Lion's bridge). It's a really picturesque place BUT in recent years it's a gathering place for illegal immigrants (called refugees by the West). It's absolutely NOT safe to be here after dark and I know it because I did my homework to check.

In the pic you see only ordinary people because it was too cold (-15 Celsius) for anyone else to go out wait for whatever.

The location check includes knowing when to be around places and when you'll get the best lighting and/or subjects.


This a picture of the famous mosque in Sofia (built by the architect Sinan back in the 16th century and still currently in use.) - and it's NOT a Friday - so I can roam around and take as many pictures as I want.

Rule 2 - try to stay unnoticed


As you can see from the pictures above - when heading out for street shots, I include people in the frame. Key to that is to AVOID getting noticed. I understand that it's not an easy task if you carry a two-kilo black camera BUT in Eastern Europe people hate being photographed without permission. You can get into a big trouble if they notice you and you keep taking pictures without their consent, you can end up in the police station.

The picture above shows a woman staring at the flag in front of the monument of the unknown (nameless) warrior (the brick building is an ancient basilica). I caught this woman by pure accident, don't even know if she was specifically looking at the flag but the image looks really dramatic. So if I had asked her to pose for me, she may have send me to hell (as some people would) or posed those artificial 'duck-face' poses I totally hate. So instead, I took a picture that doesn't show her face (which means that I can use it without her written consent, at least for non-commercial purposes).

When people don't notice you are there, you can capture a lot more candid moments than if you go around and try them to pose for you. There are photographers that can approach anyone and get the perfect posed shot - well, I'm not exactly one of them. I prefer to play the paparazzi game.

Rule 3 - Watch out for traffic


It may seem something obvious but believe me, when you start shooting, you easily forget that there other people (or cars) around you.

This building used to be the palace of the Tsar but in 1944 it was taken over by the Communists. It was built by an Austrian architect and used to have an ornate fence and gate - just like those of Belvedere palace in Vienna. The fence used to be cutting in two the street you see in the foreground but it was demolished in 1945. They had plans to destroy the building too but firstly they ran out of money and secondly some brainy people thought that it won't be a good idea. Now the building is an art gallery but nothing shows from the royal period - the place was completely robbed - the only evidence are the stone fireplaces (which are still there because they couldn't remove them).

It has a really interesting story and is one of the most photogenic places in Sofia. Only problem is that it;s located on one of the busiest boulevards in the city.

So when it comes to traffic - or anything else while you're out shooting YOUR SAFETY IS ALWAYS FIRST! No image is worth getting yourself in danger! First ensure that all other vehicles can SEE where you are and LOOK AROUND BEFORE you try to make a hasty move.

For this shot I stood on the outside line of the boulevard and had to wait for the right moment when cars were on red light :) If you have to stand somewhere on the road - STICK TO THE SIDES OR STAY IN THE MIDDLE.

DON'T MOVE BACK AND FORTH, YOU CAN GET HIT!

Rule 4 - learn a bit about the place you are shooting

Street photography is often about telling a story so take some time to learn a bit about it. Each city has enthusiasts that write about its history, you'll just have to check things out.

For example, this place (on the pic above) has a really dramatic story - my grandfather was a witness to most of it:

The place is called the triangle of power in Sofia - the building of the Presidency (to the left) and the Council of Ministers (center and left). This place has a long standing controversial history. When Communism came in 1944, the new authorities were dead set on establishing a new order. So they demolished a whole district - the so-called Targovska street (where all trade and artistry in old Sofia happened) and the other lanes around it.

In the 1950s, when they started digging the foundations for these buildings, they reached the Roman stratum of Serdica - namely the palace of Konstantine the Great. And they poured concrete on it. Because no one can be greater than the Soviet Union. Now these stand as a reminder of a totalitarian regime and of stupidity.

If you don't know what was destroyed to get these created, you might even marvel at them. So if you want to show the idiocy of the people who created the ensemble you'll need to know the story behind the place.

Rule 5 - marvel at the architecture


Street photography is often about the architecture around is. We just can't escape that - we are surrounded by it so why not trying to capture it the best way possible.

The building you see is the National Theatre Ivan Vasov which dates back to the end of the 19th century and is one of the most beautiful buildings in Sofia.

So don't try to shoot people only - keep your eyes open for the things around you.

Rule 6 - dress according to the season!!!


I should have said this in the beginning but I thought it's too obvious. Anyway, I must add this.

ALWAYS DRESS ACCORDING TO SEASON - during this photo shoot I had to wade through knee-deep snow, endured a blizzard (but I was already out so I decided to keep moving) and my hands almost froze on the camera (because, I repeat, it was -15 degrees Celsius). So I was lucky i had sturdy boots and warm coat and gloves, and a hat.

You never know what might happen so it's better to take an extra item (like spare gloves or an umbrella) instead of getting back home soaking wet or ice cube frozen :) Big cities have a few disadvantages - it takes a long time to travel in them and the weather may vary, so you can't know for sure what the weather would be at the other end.


Rule 7 - be quick with the camera

The picture above - of the guy with the red coat - is a great example for something other than warm clothes in winter. I saw him for a few moments right as he was walking towards me. It was freezing cold and to top it all - the wind was blowing snow in my face. So I was kinda reluctant to shoot but then when he came closer I decided that I just CANNOT MISS THAT SHOT. It turned out to be one of the best from the series. so I'm glad I took it. I was also lucky that it was so cold so I didn't get noticed.

So keep your eyes open and shoot everything you can - better to come home with more images than you need than to miss a one-timer.

Rule 8 - general photography rules apply here as well


If you are into street photography, you are probably familiar with all the general photography rules - like the Rule of Thirds and the like. BUT when we are out shooting and all we see is people, we tend to forget that the same basic rules can be applied here.

As you can see above, the lead-in lines help create a sense of depth and scale.

So don't underestimate the rules :) They are old but gold :)

Conclusion

I think I said it all - so all I can say here is "Good luck" and happy snapping.

If you think I missed something - write to me and I'll include it in a second post :)

понеделник, 6 юни 2016 г.

What drives a photographer mad?

I have no idea what you think but for me there are several things that really piss me off.

Image taken from http://terrywhite.com/how-i-broke-my-d700-by-tethering/


1. The megapixel question.


Number one in my list. I really can't grasp why people somehow conceptualize the megapixels to be equal to good quality photographs. It's the sensor that creates the good quality in a photo and, above all - the person behind the lens. Asking any photographer the megapixel question makes any photographer think that: 

a. You don't know a thing about photography.
b. You don't appreciate their work.


Image taken from http://randolphimages.com/the-megapixel-mania/

2. The gear question

You know,  there is always someone who wants to know 'Is this a professional camera?' as if the can only be photographed by professional gear. God forbid anyone else approach them with something substandard!  An advice - professional is the thing behind the camera - I will keep repeating that. So, don't ask about the gear - if the photographer wants (and believe me,  they LOVE talking about gear)  you'll get the information sooner or later. Asking straight away may insult the person,  as if you are doubting their abilities.


3. 'Is there any Photoshop in that?'

Now this is a painful one. There is no middle ground when it comes to post production. You either use it or you despise it. Problem is that 90% of the photographers use it,  at least 50% overdo it half of the time and there are some 10% -  the vegans of the photographic world - who can ramble for ages about that. I have an opinion but I will share it with you in a different post. Anyway,  unless you want a very long lecture or a scandal - don't ask this question.
Here is an example of what Photoshop can do - and that is a really basic editing you see there

4. 'Is this picture yours?'

As strange as it may sound but you can hear that as well. Let's make it straight - ask that question and the photographer has one more enemy on their kill list. Trust me,  if the picture is not taken by them,  they will tell you immediately. If they don't, the picture is theirs.

5.Copyright

If copyright pops up in the conversation,  just let the photographer talk. If you think that there is nothing wrong in getting a picture from Google images and then reusing it for any purpose,  better keep it to yourself. There is no photographer who thinks that copyright is useless. Believe me,  they have invested quite a lot in every shot they take. So shut up when copyright crops up or you may end up on the photographer's kill list. (again!)
Image taken from http://prophon.org/display.php?bg/новини/121

6. Titles

The title of a shot is another tricky point. If you want to know what the author wanted to say,  ask a literary critic.  What the author wanted,  they showed it on the pic. Nothing more,  nothing less. The title is often chosen to provoke but don't expect profound analysis from the author. They just FELT the title,  they can't put it in words.

7. Giving advice all the time

Ok, no-one says that you should keep silent but if you order the photographer around all the time,  better shut up.  You may have hired them for the job but it is THEM doing it. If you know so much - better do it yourself.


Image taken from http://nickgrantham.com/the-whole-world-is-a-critic/

8. Quoting what another colleague said or did

We,  photographers, are quite egotistical and self-centered creatures. We may admire what someone else did and how they did it but that's just within the guild. Outside it we want to be considered individuals,  unique artists (fill in the list with whatever you want in that line of thinking). Showing what someone does in our face (I talk about we because it's a common opinion) leads us think why didn't you hire them in the first place.

9. 'I can do it better!'

Every once in a while,  there is someone who claims that he can go and do my job better than me. More often than not,  that is a person who has no idea what photography is about and is generally a hater. Problem is that it really gets on my nerves - if you can do it better,  show it, damn it!  A picture is worth a thousand words,  after all. So if you can't prove you're better,  don't try to criticize. You have a 99% chance of getting devastated by the arguments. After all,  they have done that longer than you.

Image taken from https://ethicsalarms.com/2013/07/

10. Bargains

Here we come to the client - customer side of things. I am not saying that you should not bargain but all things should be kept at some reasonable level. I mean,  if you want the person to do a job at a 10th of the regular price,  there is something wrong. Photographers are keen on shooting no matter what. They will just go and photograph the event for free - especially if you know each other in person - you just have to ask. 99% will say YES. But offering a humiliating price (remember - less than one 10th of the regular price) will lead to end of your friendship or any other relationship you had.
Image taken from https://www.tellwut.com/surveys/lifestyle/living/835-price-haggling-bargaining-do-you-negotiate-for-the-best-price-.html

This is not an exhaustive list - I guess I can come up with a ton of other things to say but right now I can think of only those.If you have any other things that drive you mad when you take the camera - share them in a comment below or write to me to add them to a follow-up post.

вторник, 12 април 2016 г.

Lesson 3 - the colour in things - White Balance


Image taken from http://stylopics.com/tag/tumblr-photography/

Welcome to lesson 3 where we are going to let the hardware be and go a bit into software instead. I know you had to wait fro quite a long time to read that and I hope that it's worth the wait.

By now you already know important is to set the correct aperture and shutter speed to get a good exposure in order to get a good shot. Here we are going to talk about another 'minor detail' that can ruin things if you are not careful. That's white balance. 

By now you probably wonder what white balance is and why do we have to care about it. can whiteness can be balanced? Isn't white supposed to be only white? Yes and no. White balance stands for the way your camera sees the light regardless of what you see. It has to do with the computer inside the camera - remember that I mentioned that in the beginning? So that computer processes the shot BEFORE it gets recorded. Thus the light that to us may have no colour gets one in the picture.
So white balance matters -  it's name comes from the way the white colour changes when you adjust the different settings. Most people learn that setting first. Some never get past that post. If you are wondering right now if you have used the feature or not - look below. if any of those icons looks familiar - you already have.

Image taken from http://www.geofflawrence.com/white_balance.html

If you don't know where are they in the camera menu - take a look at the picture below:


When you click there you'll see this:
Image taken from http://blog.uniquephoto.com/quick-tip-how-to-set-custom-white-balance-on-a-canon-dslr/


So - here's the catch - the difference between those is measured in COLOUR TEMPERATURE - usually in degrees Kelvin -  THE SMALLER THE NUMBER THE REDISH IT ALL LOOKS. Check out the table below to see what I mean: 

Image taken from https://romangronkowski.wordpress.com/2014/10/22/white-balance-and-colour-temperature/

So we care about the colour temperature when we take pictures because if we do not select the right one - it will affect the way the whole picture looks like - and exposure will not correct things. Imagine it as an in-built Photoshop that works on your image before you can correct things. If you are not careful - you can get the whole thing wrong.


Image taken from http://www.fotozzoom.com/blog/top-10-photography-mistakes-avoid-beginners/


With some modes and some situations things are OK but sometimes you can get the whole picture looking red or blue or orange, Some photographers use it as a creative device (for example when you shoot a sunset you will want to get it as colourful as possible so you select a mode that would give you rich reds and oranges) but as a rule if you are a novice - TRY TO USE THE MOST NATURAL-LOOKING MODE.  You'll need to switch between modes a bit but in time you'll know what to use when you see the object.

Do you feel knowledgeable already?

неделя, 21 февруари 2016 г.

Corinth Canal - part 2 - or why getting lost helps?

I've always wanted to take a picture of Corinth Canal with a boat inside it - you know, like the iconic picture below. 

Image taken from http://traveltamed.com/places-to-visit-in-greece/
If you have read the previous post, you already know what happened on day 1 and you probably know that I was dead-set on getting things right today. This part of the story starts in the morning at the hotel reception. 

Totally into the idea of getting a shot like the one above, I went to ask about ships. After all, they should know, right? The guy at the reception was very helpful but I doubt he understood much of what I had in mind told me that tourist boats go inside the canal but big ships are few and far between. Still, I was determined to go there and take my iconic shots. 

In the morning we went to Mycenae (which is the topic of another post) and at 11 am we drove back to Corinth - the distance is roughly 60 km. 

Where IS the canal???

There was a road sign on the highway but from Peloponnese there was none. So we got a panoramic view of Corinth and its streets. And the oil refinery. If you book a hotel - check where it is on the map because there is a very high chance of being close to the refinery. And that is HUGE! If the hotel is close - you will enjoy the smell of petrol derivatives 24/7. Corinth is a really nice town with plenty of things to see for it's size and no doubt - amazing accommodation and taverns - but the smell of petrol is not one of my favourites. Luckily we checked that BEFORE we went there. 
One of the beaches of Corinth that I managed to shoot along the way.
We went in and out of Corinth several times during some of which we came close to the channel. Twice we went over a submersible bridge at one end of the canal and we kept driving along one of its sides. 
The bridge I was talking about
The lagoon - the black and yellow thing on the left is the bridge
You can see it's there but you cannot reach it. You see where it is but you don't see where to turn for the viewpoint. 
The end of the canal as seen from the submersible bridge. The image is taken from a car in motion - you cannot stop there
Time went on and the sun went down - and I got nervous. Meanwhile we kept circling the streets of Corinth. 
One of the views of Corinth I managed to capture
 After all, we had only two days in that part of Peloponnese and it was already day 2! Bearing in mind that the pictures from yesterday I can happily delete at any instant because they show nothing of the canal that I wanted to capture.  (you can see the previous post to get the impression of how bad things were). 
The view from the submersible bridge - again!
After a few zig-zags in and out of Corinth - AGAIN! - we got to the viewpoint. Time: 12.30. Not too late, I hoped. I got out of the car and started running - at 30 degrees plus Celsius - and started frantically taking pictures of practically everything I got my lens on. Thank God I got the wide angle lens!!!
The canal from the other side of the bridge
Time went on and I got to the other side of the bridge (remember what I told you about the viewing platform being nonfunctional). 
This is the iconic view of the canal. Shot from the pavement of the car - bridge. Basically hanging on the safety fence for the shots of that side of the canal because the viewing platform was closed. 
By the time I was done with preliminary shots, it was around 1 pm.
Guess what??? At the far end of the canal I saw a boat approaching! A BOAT! No matter the time, I was totally into waiting for the boat to come to me - and even to get out of the canal.
One of my favourite shots from the day and roughly what I came to Corinth for :) 
 It was the picture-postcard thing I wanted to do!!! So I waited - it turned out that I didn't have to wait for a long time - some 15 minutes.

It was a miracle! My dream came true (well - sort of - it was a big ship but this little boat was ideal to show ho big th channel is). 
Another of my favourite shots
So I started snapping as if I had a machine gun - click, click, click, chat, chat, chat, chat! I LOVED IT!!! I was glad we got lost, after all - because otherwise we would have gotten to the canal earlier and we wouldn't have seen the boat. 
Sometimes getting lost helps.
Now, the technical information: how to get a picture like that?


The boats

There are several tourist boats that get inside the canal - either to show it to the tourists or just for the fun of being photographed from above (the people in the boat were having a great time while I was taking those shots). The boats have different schedule - so make sure you check it out first before you get on location. I think that there is at least one of them that gets inside the channel at midday - which means - somewhere between 12.00 and 13.00 pm and I think that there is another one later on during the day. 


The light
Make sure to be on location at midday - when the sun falls directly from above and the water inside the channel looks azure. Trust me, you won't regret it. 
If it is cloudy - any time would be suitable. But the water is less likely to be azure. 

Clothing

It is generally HOT in Peloponnese 7 months out of 12 and temperatures rise up to 30 degrees Celsius (and often higher - when we were there temperatures ranged from 30 to 38 in different parts of Peloponnese) so make sure you have sunscreen, a hat (it's windy at the bridge so make sure you keep it ON your head in some way) shorts and a T-shirt. Sneakers are a must - you'll need all the stability you can get while on the bridge. 
The bridge - again, in case you didn't pay attention last time
Gear

Any camera would do but let's try to get the DSLR settings:

  • manual mode - f/8 - f/18 (depends on your ideas and the amount of light) - you need a BIG f/ number to get the bottom of the channel sharp; shutter speed - 1/320 sec + (in case there is a boat around - they move quite fast)
  • images shot in RAW (or the highest quality JPEG) - so you can use your files later on.
  • lens - wide angle is a must - you don't have much space to move around either way. 10-18 mm is a good choice but if you don't have one - use the widest setting of your lens (normally that is 18 mm). Forget about telephoto lenses unless you want to get a portrait of someone in the boat below.  
Safety precautions
Corinth canal is one of the two entry points from mainland Greece to Peloponnese (I keep repeating that, I know, but I hope that it gets stuck in your head) - the road that hosts the railing is VERY VERY BUSY!!! You can see trucks, buses (tourist and municipal) and cars of all brands and sizes driving over it at any minute. So:

  • Do NOT go in the middle of the road for no reason (it is narrow enough)
The railing of the bridge in detail. 
  • Do NOT hang over the railings!!! You don't want to risk a 70-meter fall down to the 8-meter deep water. (I am myself afraid of heights and that one took my breath away but still...) If the other viewing platform is still closed (as it was when I was there) DO NOT TRY TO GET ON IT!!! If they closed it - they probably did it for a reason - probably it is not stable enough to host ANYONE. DO NOT play the hero!
A side shot of the canal to show you ho deep it is.
Last note - Corinth Canal is one of the most spectacular places I have been to. If you are in the area - do go there. It's worth it!
Corinth has other places to see as well - Ancient Corinth is a must - see and has a great view and they have to have a museum or two. 

For those in love - bring a padlock and lock it on the bridge - many couples do that like they do it in France. As you can see from the picture above - they are quite a few. 

събота, 20 февруари 2016 г.

Corinth Canal - part 1 - or why light matters?

I've been thinking a lot about what to write next in the Travelogues section and I kept coming up with one and the same idea - Corinth. 

Read part 2 here


Here we are - next topic is Corinth Canal or Korinthos Isthmos (or if we want to be exact - Ισθμός της Κορίνθου in Greek).

Where is that? 
The most logical question here is to ask - where is that on the map? If you are not interested in geography, history and you don't live on the Balkans, you probably have no idea. The answer is simple and it is GREECE. 
Image taken from http://www.worldatlas.com/webimage/countrys/europe/corinth.htm

So far so good, but where in Greece? After all, it's not that a small country. I will not keep you waiting - it's between Peloponnese and mainland Greece. You can see it on the map below:
Image taken from http://www.worldatlas.com/webimage/countrys/europe/corinth.htm
In case you don't know - Peloponnese is the biggest peninsula in Greece and the south-most part of mainland Greece. Don't worry - there will be a post about Peloponnese as a whole later on. 
Corinth Canal is what separates the peninsula from the rest of Greece. 

A bit of history. How, why and when was the canal created?
Before I went to Corinth, I thought that the canal was made in ancient times. Turned out that in ancient times Corinth was one of the wealthiest towns in Greece but not because of the canal - it was the lack of it that made people so wealthy. Corinth had two harbors - one of each side of the Isthmus - and ships used to be dragged from one to the other. Of course, Corinthians charged travelers for the service - even if you don't want to transport the whole ship across the land, luggage still had to be carried to the other harbor. The alternative was going around the island of Kythira and facing the danger of getting in one of it's notorious currents and storms. Most ships didn't want to risk that much. 
Nero's plan for the canal
Image taken from https://en.wikipedia.org
The whole process was so uncomfortable that even at ancient times emperors such as Julius Caesar, Caligula and Nero planned to dig a canal to end the misery.  Problem was that none of them lived long enough to do that. In later centuries plans were forgotten and after the Ottoman empire came in the 15th century - people had bigger problems... 
Things changed in the 19th century when Greece got its independence. The Greek government asked a French company in the 1830s to dig it but the price - 40 million gold franks - was too high so the project was abandoned for a couple of decades. Then, in the 1880s another French company took the project. Before it was built, several companies and entrepreneurs got bankrupt before it was finally opened in 1893. 
The canal during construction in 1882
Image taken from http://corinthianmatters.com/2013/01/18/historic-photos-of-the-isthmus/
Still, there were some problems.
Problem 1 - the canal was too narrow which meant that big modern ships, which were just evolving back then, could not use it. Narrowness meant that there was a lot of wind in the canal itself. So many ships avoided it anyway. 
The canal during construction in 1884
Image taken from https://corinthianmatters.files.wordpress.com/2013/01/isthmus-1884_551573_536651073012278_1728426558_n.jpg
Problem 2 - the different tide time of the two seas on both sides of the canal which made it difficult to navigate and caused dangerous currents inside it. 
Problem 3 - Greece is a highly seismic region. The canal location is even more so. Besides - the rocks are of sedimentary nature and thus - are quite unstable. That meant a lot of landslides.
Things didn't get better in the 20th century either - WWI and WWII did their job well to slow the traffic down to a trickle. Still, the canal is a wonder of the engineering mind and a spectacular place to visit. 
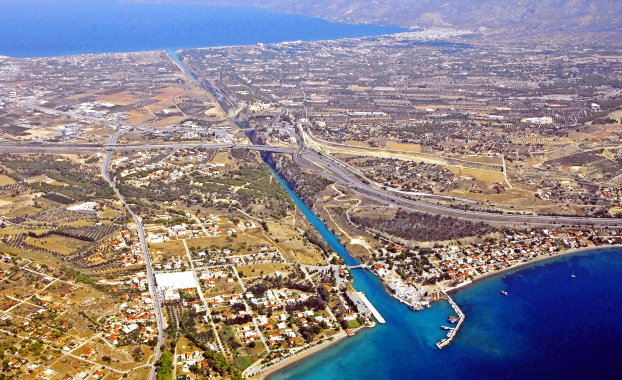
The canal as seen from above
Image taken from http://www.sailingissues.com/corinth-canal-diolkos.html
How to get there?
Here are a few ways:
Route 1 - say you are traveling by car - you'll need the highway that goes to Athens first. When you get to Athens the highway will fork - one part goes down to the gates at Piraeus and the other goes for Corinth. You need Corinth. The view from that part of the highway is really nice because you drive along the coast. Just follow the big green roadsigns (which will show the nearest town - in our case Corinth). The distance between Corinth and Athens is roughly 80 kilometers.
Route 2 - get on a plane for Athens. When you get at Venizelos airport (aka. Athens' airport) you get a rent-a-car and follow the instructions from Route 1.

What we did is to drive all the way from Sofia to Athens - which is 800 something kilometers (thank God for Greek highways!!!) and then to Corinth in one day (thank God the driver LOVES to drive!!!). 

How to find the canal???
If you have seen the pictures on the net (as I have) - you probably imagine a narrow and shallow little canal in the middle of a meadow. Truth is very far from that. The main traffic from mainland Greece to Peloponnese goes ABOVE it (I mean literally above it!!!) and you can see that it is DEEEEEP. REALLY DEEP. 

Once you get near the town of Corinth, there would be a big (you can't miss it, it is several meters wide) green road sign reading Korinthos Isthmos (in Greek and Latin alphabet). You take that turn RIGHT (if you are coming from Athens as we did) and then follow the main road that goes to Peloponnese. You need the main road that says Tripoli (the next bi town along the highway) or Nafplion (the nearest town in Peloponnese). There are NO other roadsigns indicating where the canal is once you enter Corinth. Guess it is because everybody knows it and if you ask, they will be happy to show it to you. 

Check out Google Streetview !!!!! to see where exactly you have to turn (LEFT, I think, if you are coming from Athens) for the parking and the viewpoint. There would be NO sign - if you are driving along the canal already, you have missed it. There is a big municipal one that is free of charge and you can buy souvenirs as well. There are no tickets for the view - after all - it is on the main road.  

What to do?
As I said above, the main traffic in and out Peloponnese goes ABOVE the deepest part of the canal (where all the pictures are taken). The bridge that houses the main road also houses the viewing platforms - that would allow you to peer around 70 meters down to the bottom of the canal and take a few photos of it. 
Problem 1 - when we went there one of the viewing platforms on the left/right hand side of the road (depends on the direction you are going) and which hosts the iconic view of the canal was closed. 
Problem 2 - The viewing platforms are NOT part of the bridge - they are metal constructions that are attached to the concrete base of the road - so all the vibrations from the traffic on the road are felt on the bridge. Trust me, if you watch the abyss below - that's not fun. 
What you can see from the other side of the bridge - photo from the evening

Problem 3 - The platforms are fairly narrow so if you want to take a picture of yourself AND the canal WITHOUT having the railing and the platform in shot, you won't succeed. The other option is to hang on the main road and risk getting run over.
Don't get too excited  that picture is from the next day. That is the viewing platform

Problem 4 - The road is REALLY busy - almost every minute you have a truck or a bus on it - so you cannot (even if you are such an idiot) stand in the middle of the road to get a better vantage point. 

The canal
When I saw the pictures of the canal I thought it is deep but when I was it in real life - my jaw dropped. 
I'd be honest - I'm afraid of heights. Well, I don't faint or something, but I don't like being that high. High buildings are OK, as long as I don't have to go on a balcony (which is another story). But walking over an around 70 meter abyss... is quite another matter. As I said, my jaw dropped!!!
The view is A-M-A-Z-I-N-G!!!
What I saw at 6.30 pm

Problem 5 - By the time we got there (after a 10-hour drive from Sofia) it was already past 6 pm. That is not much of a problem but light is all about the view of the place. Main problem lies in the depth of the thing - the less light you get, the darker the bottom is. Water is only 8 meters deep so it is a lovely hue of blue when it is lit. 
In my case - it was dark as hell and I was furious. I've been dreaming about going there for a long time so I didn't want to miss it. The only resolution was to get back the next day when the light was right - which meant at midday when the light falls directly from above.  That was despite the fact that we had to visit Mycenae and a few other archaeological sites. I hoped that I would be able to take the picture I want.

About that - in a follow-up post!